Beginning your yoga journey can be daunting if you don’t know how to start. A lot of beginners have a sense of unworthiness to attend classes. It can be scary to feel like you are the only one who doesn’t know the difference between warrior one, two and three. But this shouldn’t stop you from embarking on this amazing journey of self discovery.
When I attended my first yoga class, I felt awkward and disconnected from my body; I didn’t know what or how I was supposed to feel. It wasn’t until these three poses I'm going to share with you were broken down for me that I was able to feel a strong connection to my body and breath. I feel that these foundational yoga asanas are important for those new to yoga in order to help build and support this connection.
The best way to master these poses is to use a mirror or take photos/videos. By seeing yourself, you can make small visual adjustments that will help increase body awareness and develop muscle memory for each pose. Finally, be sure to hold each asana for at least 10 to 15 breaths.
Here are three foundational yoga poses that you can master at home either before plunging into your yoga first yoga class or even if you're trying to re-commit to your practice.
Tadasana (Mountain Pose)
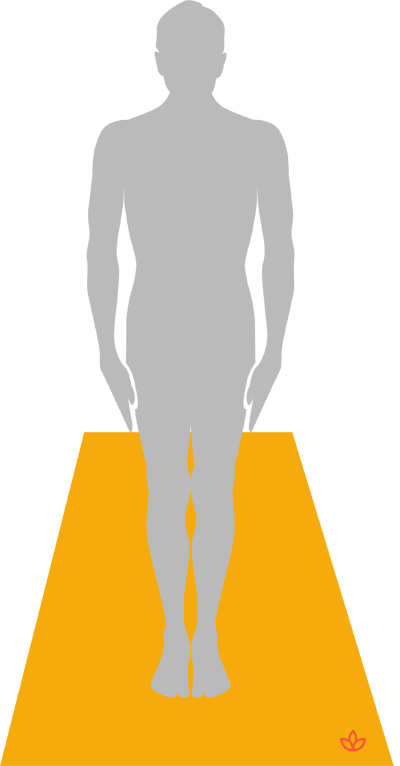
Tadasana is a base for all standing poses that requires full body engagement. It helps to create body awareness and a focus on the breath. These two elements are essential in a yoga practice and this pose will give you the foundation to further your practice.
Alignment Tips
- Start from the core and work your way out
- Neutral pelvis
- Contracted abdominal and glute muscles
- Allow the chest to open with shoulders back and down
- Ground the four corners of the feet and engage the arch of the foot
- Arms and hands at your sides and activated
- Lift through the crown of your head
What You Should Feel
The entire body should be activated and you should feel energy moving throughout. You should not feel bored as though you are standing and waiting for the next pose. You should feel strong, tall and balanced. You should not feel like you are tipping forward or backward. Your breathing should not be passive.
What to Keep in Mind
The feet may be pointed outward, straight or inward, depending on what is comfortable for you. The weight should be evenly distributed through the feet — they should not feel like they are tilting inward or outward. Feet can be together or apart, whichever allows you to attain a comfortable balance. The most important thing about the feet is that they are rooted and activated.
The lower back should not be arched if you can help it. The tailbone should not be tucked in too far either. The draft is that the spine is straight without causing discomfort in the lower back. Find your happy medium to attain a neutral spine.
The chest is to be open, but not sticking out. The shoulder blades are back and down, but not pulled inward toward each other. The spine is draftlly straight without causing discomfort in the upper back.
Modifications and Variations
- Try practicing this pose against a wall.
- For a small challenge, try this pose with your eyes closed.
- Explore different hand positions (mudras) and try with your hands overhead.
(More on this pose in Ground Into Tadasana to Connect With Your Root Chakra.)
Paschimottanasana (Seated Forward Bend)

Paschimottanasana is great for entire backside of the body — from the spine and the hamstrings, to the calves. This pose also helps stimulate the abdomen. The tips below are focused on an active form where all muscles are activated.
Alignment Tips
- Starting from the lower body, be seated in a way that ensures that the pelvis is tilted forward and the sit bones are grounded.
- Gently flex the feet and engage the legs.
- Elongate the upper body by lifting through the crown of the head.
- Fold forward from the hips and stop when your mid-back starts to round.
- Extend your arms in front of you, and keep the shoulders back and down. Reach for any part of the legs, big toes or soles of the feet and stop before your back rounds.
What You Should Feel
You should feel a nice stretch in the back of your body — the shoulder, hamstrings and possibly calves. You should not feel any pain in the back, hamstrings or ankles/feet.
What to Keep in Mind
If you cannot touch your toes while keeping your back straight, that is perfectly normal. As you bring your upper body forward, stop when your back begins to round, even if it’s not much passed 90 degrees.
Your feet do not need to be together, but explore both with feet together and apart. If the belly does not feel comfortable with the feet together, widen them apart until you are comfortable. You can also explore internally rotating the thighs and see if that gives you a better stretch.
Modifications and Variations
- If you cannot reach your toes and want a deeper stretch, use a strap or scarf to wrap around the balls of your feet and hold with both hands.
- If your pelvis tilts backwards, it may help to lift the pelvis up by sitting on a block, a bolster or a rolled-up blanket.
- Bend the knees and place a rolled-up blanket underneath if the stretch is too intense. This may help you reach your toes faster, but you can also use a strap with the knees bent.
Kumbhakasana (Plank Pose)
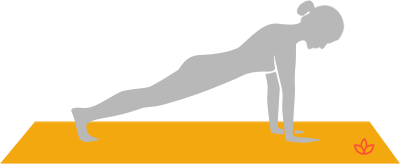
Kumbhakasana improves abdominal and shoulder strength. It is a great asana to build awareness of the body and strength for balancing poses.
(Here are 6 Tips to Maintaining Balance on the Mat.)
Alignment Tips
- Find the “sweet spot” where your hips are not too high or too low. They should be right in the middle so that you can really engage your core. Avoid the pyramid shape.
- If you are using open hands, protect the wrists by evenly distributing the weight: press firmly into the mounds of every finger and avoid dumping weight into the wrists.
What You Should Feel
You should feel this mainly in your abdomen, and possibly your shoulders and hands. You should not feel pain in your wrists, back or shoulders.
What to Keep in Mind
Your hands or elbows (depending on variations) do not have to be right underneath your shoulder, they can be a little bit further ahead — whichever is most comfortable.
Depending on your intention, your shoulders can stay back and down, or they can round as if you are pushing the floor away. For beginner purposes, it might be better to keep the shoulders back and down.
Modifications and Variations
- To make it easier, bend both knees to the floor.
- If your wrists hurt, balance on your fists or come down onto your elbows.
- Use a wedge or a folded mat to lift the wrist and force the weight to distribute evenly through the hands.
Master Class
Mastering these poses does not mean doing them to the most advanced variation; it means doing them with purpose and mindfulness in order to reach your body’s own capabilities. By practicing these poses, you allow yourself to be more connected to your body and breath. They will help create a strong foundation of body awareness, which will vastly improve your practice — whether at home or in a yoga studio.
(Read on for a Fundamental Yoga Sequence for Beginners.)
During These Times of Stress and Uncertainty Your Doshas May Be Unbalanced.
To help you bring attention to your doshas and to identify what your predominant dosha is, we created the following quiz.
Try not to stress over every question, but simply answer based off your intuition. After all, you know yourself better than anyone else.