Now that you have taken steps to begin your yoga journey at home, it is time to add to your repertoire! Whether you are still learning or want to build a better base for your practice, breaking down and exploring each pose will help you maximize the benefits and reduce risk of injury.
In addition to the first 3 foundational poses (Tadasana, Paschimottanasana and Kumbhakasana) in New to Yoga? 3 Foundational Poses You Can Master at Home, these asanas will help develop and progress your practice at home and allow you to rock it in the studio. To ensure you are mastering these poses, it is wise to take photos/videos of yourself or use a mirror. Having a visual of yourself allows you to understand how to better position your body and helps to increase overall awareness. Try to hold each pose for 5 – 10 breaths.
Adho Mukha Svanasana (Downward-Facing Dog Pose)
Adho Mukha Svanasana is used in many yoga classes during Sun Salutations and as a transition into other poses. This pose helps to build upper body strength while also stretching out the lower body.
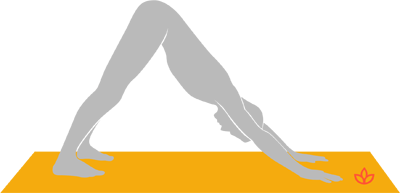
Alignment Tips
- Distribute weight evenly between hands and feet
- Spread the fingers out and press through evenly
- Maintain a slight bend in the arms
- Lengthen the neck by bringing the shoulders away from the ears
- Keep the spine straight (bend your knees and lift the heels if that helps)
- Reach the hips to the sky
What You Should Feel
You should feel stable because the weight is distributed evenly. Your palms, fingers and upper arm muscles should be activated and engaged as you press the floor away. You should not feel pain in the wrists.
What to Keep in Mind
There may be several reasons why the heels may not touch the floor. That’s OK! The key thing to remember is to keep the spine straight. That may mean bending the knees and/or having the heels lifted, both of which are completely okay to do. Keeping a straight spine helps to keep the bend from the hips.
The feet may be more, less or equal to hip-width apart, and the arms may be more, less or equal to shoulder-width apart. This is under your discretion as to what feels best for you.
Modifications and Variations
- If you feel pain in your wrists, place blocks under the hands to help decrease stress on these joints
- For wrist pain, you can also try using a wedge or folding up your mat to lift the wrists up and ensure you are pressing through the hands
- Bend the knees and/or lift the heels in order to keep the back straight
- For a small challenge, try lifting one leg up and move into 3-Legged Downward Dog while keeping the hips square and the lifted leg engaged
Bhujangasana (Cobra Pose)
An excellent and effective alternative to Urdhva Mukha Svanasana (Upward-Facing Dog Pose). Bhujangasana is a great backbend to perform as a beginner. It opens up the chest and shoulders and stretches the abdominals. It puts much less stress on the back and wrists than Upward-Facing Dog Pose while still strengthening the arms and shoulders.
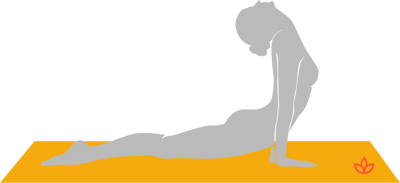
Alignment Tips
- The shoulders gently fall away from the ears as they soften down and back
- Gently bring the shoulder blades closer together and open the chest
- Keep the neck in line with the spine and lift through the crown of the head
- Press evenly through the hands, avoiding dumping weight on the wrists
- Lift your upper body and stop when you have a c-shaped curve in the back
What You Should Feel
You should feel the hands, arms and shoulder blades activated and a stretch in the chest. You should feel a bit of tension in the lower back, but not enough to cause discomfort or pain. You may also feel a stretch in the abdomen. You should not feel pain in the wrists, lower back or shoulders.
What to Keep in Mind
Start with your palms down on either side of your chest before pressing and lifting the chest. You can lift your chest up a few inches off the ground or until your elbows are at 90 degrees. Your hands can be placed in line with the shoulders or further apart as long as your body is stable and you are able to lift your upper body with control. Your feet can be together or hip distance apart, but can also be further apart if it decreases tension in your lower back. The thighs and tops of feet remain on the mat.
Modifications and Variations
- To help stabilize your upper body, place a rolled up blanket or bolster underneath your chest. This will help give more support to lift your chest while you continue to build strength in your arms and shoulders.
- Half Cobra Pose is a great variation to start with. In this variation, the hands are placed on the mat on either side of the chest as you slightly lift the chest. You do not need to press through the hands in this asana because they act as support to keep you stable while you lift.
- If you would like to increase the sensation in the lower back without lifting your chest higher (to maintain a c-shaped back, of course), slowly bend your knees and lift your feet up. Lower them down if you feel discomfort or pain.
Vrksasana (Tree Pose)
Vrksasana helps to improve bi-lateral balance and is a great preparatory pose for all other standing balancing asanas. It helps strengthens the feet, ankles, legs, glutes and spine while providing a stretch in the chest, groin and inner thighs. This pose also helps to improve mental focus and leaves you feeling grounded. (Learn more in Plant Yourself in Tree Pose & Blossom With These 6 Benefits.)

Alignment Tips
- Start from the ground up before lifting the opposite leg. Ground all four corners of the foot down on the mat, activate the glutes, then neutralize the pelvis and engage the rest of the core
- Do not rest the lifted foot on the knee
- Keep the gaze at an eye-level; focus on a non-moving object to help obtain and maintain balance
- Square the lower body facing forward and try to level out the hips so they are both in the same line
- Shoulders drop away from the ears and back as you gently open the chest
- Lift through the crown of the head
What You Should Feel
You should feel your entire body engaged. The feet and ankles are the stabilizers for this pose and if they are weak, you may feel wobbly. As you distribute the weight evenly through the foot, you will find more stability. If you are placing your lifted foot on the standing leg’s inner thigh, you may feel the foot slipping. If the foot slips, try pressing the foot and the inner thigh into each other. If it continues to slip, place the foot against the inner calf instead of the knee.
You should feel a stretch in the groin and inner thigh once the foot is stable and the knee opens up the hip.
What to Keep in Mind
Keep one hand on your hip while your other hand slowly places the lifted leg’s foot. Once the foot is in place, keep both hands on the hips until you find alignment and balance. Bend the standing leg's knee slightly to ensure engagement in the quads.
Modifications and Variations
- If you are new to balancing poses, try standing against a wall or place one hand on the wall for balance
- To start, the non-balancing foot can rest with ball of the foot on the floor and heel leaning onto the inner calf. Once balance is achieved, the foot can rest on the inner calf or the inner thigh.
- If this pose is not accessible to you while standing, try while laying on your back and use a block under the bent leg if needed
- If you want a challenge, try this pose with your eyes closed beside a wall
Master Class
In order to master these asanas, you must perform them with purpose and mindfulness. By moving into these poses slowly and with control, you will become more aware of sensations in the body and feel more connection with the breath. Adhering to your body’s own capabilities will allow you to create a stronger foundation for more advanced asanas and will minimize any risk of injury at home or in the yoga studio.
During These Times of Stress and Uncertainty Your Doshas May Be Unbalanced.
To help you bring attention to your doshas and to identify what your predominant dosha is, we created the following quiz.
Try not to stress over every question, but simply answer based off your intuition. After all, you know yourself better than anyone else.