We all live in different bodies. Given our unique shapes and structures, Virabhadrasana A in my body has a different look and feel than the same pose in your body.
The first step to your best warrior sequence is acknowledging that there is no picture-perfect expression of the virabhadrasana poses that fits in every body.
There are aspects of each pose we might wish to feel: the heart-opening of warrior one (Virabhadrasana A), the laser-focus and strength of warrior two (Virabhadrasana B), the determination of warrior three (Virabhadrasana C). In this article, we discuss physical modifications to the poses that can help you achieve more freedom and stability in the poses of the warrior series.
Alignment Principles Common to the Warrior Poses
The most important principle of physical alignment is to start where you are.
- If it hurts, it isn’t right. No yoga pose should cause pain, especially not joint pain.
- The spine is the center of the pose. If the spine is uncomfortable or compromised, the pose isn’t right. Arrange the feet, hips, and arms so that the spine can be long and strong. Whatever back-bending, side-bending, or twisting you do should be intentional, not a result of trying to put your feet, hips, or arms in a configuration that isn’t right for your body.
- To lift up, push down. The ability to lift the heart up (in warrior one), to reach the fingertips away from each other (in warrior two), and to hold the back leg near perpendicular to the floor and push the back heel toward the back wall (in warrior three) comes from the ground.
- Avoid unnatural angles of stress. In each pose in the warrior series, the front knee should be over the front ankle – not pushing past it or rolling inside toward the midline of the body.
- Relax the shoulders. After arranging the rest of the pose, take a breath to relax the shoulders.
- Soften the muscles of the face and around the ears. To release the excess tension we sometimes accumulate through effort, scan the head and neck for tightness hidden in the many tiny muscles. Around the eyes, the temples, the roof of the mouth and the jaw are common places to find habitual tension. The warrior poses are a great place to study where in the body we direct tension when we are under strain, and to learn to be release unnecessary effort.
Tips for Warrior One
The goal: a grounded experience of open-hearted freedom.
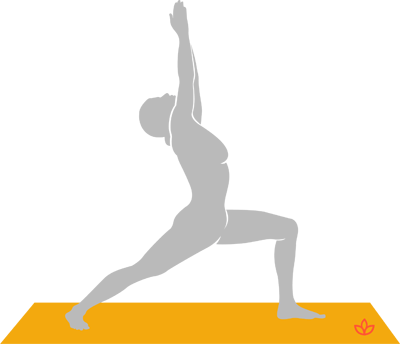
How to get there: Many people stand with their feet too close to a single line in this pose, introducing a twist in the lumbar spine that makes back-bending both uncomfortable and, at times, unwise. To address this issue, keep the feet at least hip-width a part, as if on railroad tracks, rather than both feet on one line.
Back-heel lifting? Try taking a shorter stance, drawing the back foot closer to the front and setting it as wide as you need to in order to feel both feet firmly connected to the ground. As your ankles and hips grow more flexible and your knees stronger, you will likely be able to take a longer stance, but rushing to that expression undermines the body’s ability to do so safely.
The hips should be comfortably neutral with the low belly supporting the low back, which is long and strong and only minimally participating in the backbend.
If you feel discomfort in the shoulders, try opening the arms wider to help support the heart-opening of the back-bending without creating a pinch in the shoulders. This also helps the shoulders stay relaxed.
Keeping the face and shoulders relaxed, press the feet into the floor, integrating that power into the torso and using it to help the shoulder blades raise the heart up.
Tips for Warrior Two
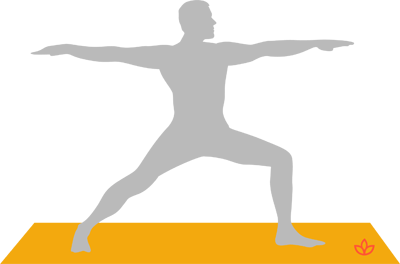
Rather than facing toward the front of the mat, reach the hips toward the long edge of the mat and keep the front heel will be in line with the back arch – unless this causes the front knee to roll in or causes discomfort in the back knee.
The hips have to be comfortable for the spine to be comfortable. If you feel discomfort from the torso down, try doing the pose with your eyes closed and find a way to be in the pose that makes you feel strong and aligned. Then open your eyes and learn what changes you made.
Really shine your energy from your heart center all the way to the tips of your fingers. No limp fingers!
(Learn more in Cultivating Power in Your Practice with Warrior Two.)
Tips for Warrior Three
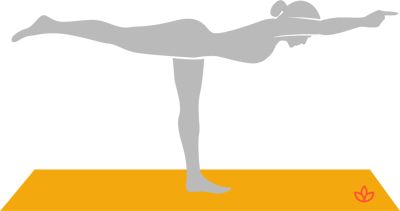
One way to work toward a strong warrior three is to use a wall. Put the short end of your mat toward the wall and start facing a leg’s distance away from the wall with your back to it. With a block in each hand, reach one leg behind you so your toes brush the floor.
Hinge forward at the hip and engage the muscles of your torso to maintain one long line from the crown of your head through the heel of your flexed back toes. If you stop before you find the wall with the back foot, that’s fine, as long as you maintain that strong, central line.
If you can, bring the long line of your body to be parallel with the floor. Rest the blocks on the floor and press the fingertips into them while pressing the back foot into the wall. Feel strong in all four points of contact – the wall behind you, the floor beneath your standing leg, and the blocks beneath both hands
Tips for Reverse Warrior/ Peaceful Warrior
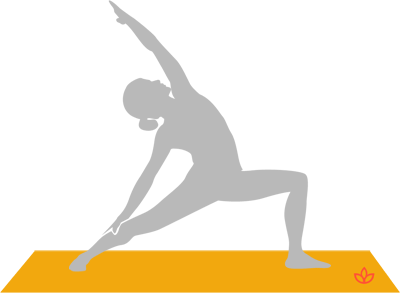
Don’t let the front knee wander in. Very often when a person reaches back in peaceful warrior, the alignment of the legs is neglected.
Reach both up and back. Think about growing the spine long while rolling the side body open.
Final Thoughts
The warrior poses can be among the most empowering in the standard family of poses.
To reach that experience, be mindful of your particular body, accepting your shape and structure and using it to help you reach stability and freedom.
(Learn more in Stay Present: Improve Your Virabhadrasana Series With These Mindful Tips.)
During These Times of Stress and Uncertainty Your Doshas May Be Unbalanced.
To help you bring attention to your doshas and to identify what your predominant dosha is, we created the following quiz.
Try not to stress over every question, but simply answer based off your intuition. After all, you know yourself better than anyone else.