I CAN’T do yoga, I’m not flexible!
If I had a dime for every time I’ve heard this…well, let’s just say I probably wouldn’t need to teach yoga anymore.
Any yogi will tell you that stiffness, far from being a reason to forego yoga, is actually one of the BEST reasons to DO yoga! In the physical sense, flexibility refers to the range of motion of a joint.
Yoga works to increase flexibility in a couple of ways. A daily practice of poses held for 30 seconds or more and repeated several times a day over an extended period of time actually elongates muscle fibers. Greater length in muscles increases the range of motion in the joints they move. In this way, functionality is increased and chances of injury might be lessened over the long term.
But the good news is that even in the short-term we can reap the benefits of yoga for enhanced flexibility. The truth is that every time we stretch, there are immediate gains in range of motion simply due to changes in neural drive, the signals received by the muscles from the nervous system.
What’s important to understand is that, contrary to many common assumptions, stretching is not only about lengthening muscles, but equally as much about relaxing them. That feeling you get when you soften into a stretch and feel a release that allows you to go deeper into a pose is key to becoming more flexible through yoga.
The bamboo that bends is stronger than the oak that resists.
– Japanese Proverb
The benefits of yoga, though, go far beyond greater ease of movement. The flexibility we gain in postural practice serves us not only in the body, but in the mind and spirit as well.
As we adapt and breathe through challenges on our mats we learn how to become more adaptable in our character as well. Yoga teaches us how to respond to challenges with resilience and flow with the changes in our lives with greater awareness. We learn that true strength is not hard and rigid, but is found in our ability to yield and go with the flow, to bend without breaking.
HOW you do yoga is just as important as WHAT you do. Remember that in yoga, it’s not only what you do but how you do it that’s important.
A Few Things to Keep in Mind:
1. LEARN THE BASICS. If you’re new to the practice, it’s always better to learn under the guidance of an experienced teacher who can teach you the basics of pose alignment and safe, healthy functional movement.
2. FIND THE BALANCE BETWEEN CHALLENGE AND EASE. In each pose, work at the edge of your ability to stretch while respecting your limits, including any active or past injuries.
3. BREATHE, SOFTEN & RELEASE. As you hold each of these poses, use your breath and your awareness to soften and relax at the frontier of your range of motion. Remember, while we might think that active stretching is what will make us more flexible, what actually allows muscle fibers to stretch more effectively is when they release.
4. BECOME MORE FLEXIBLE IN MIND AS WELL AS BODY. Though postural practice certainly can be enjoyable and even fun, yoga is not necessarily designed to be easy. And therein lies the opportunity! When you notice yourself feeling challenged, distracted, bored, or simply resistant to holding a pose see if you can breathe through that resistance. As long as you aren’t feeling any pain or undue strain, try and stay one or two breaths longer.
Here are ten basic yoga poses that will stretch all the main muscle groups of the body. As you practice these, see what they might also teach you about becoming more flexible on all levels.
Hold each pose for five to ten breaths. Maintain a smooth and even flow of breath throughout your practice.
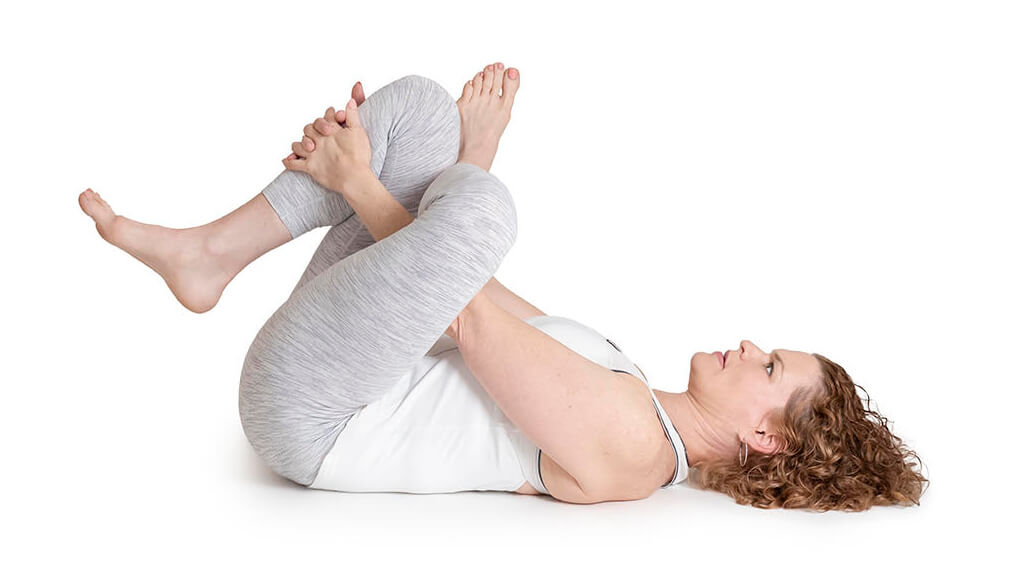
- Lie on your back, bend your knees and place your feet flat on the floor, hip-distance apart.
- Bend your left knee in and place your outer left ankle just above your right knee.
- On an exhalation, draw your right knee in toward your chest. Slide your left hand and forearm through the space between your legs and clasp both hands around the back of your right thigh or the front of your shin.
- Keep your back flat on the mat. Relax your shoulders and broaden across your collarbones.
- As you stay in the pose, draw your right knee gently toward you and perhaps extend your left knee away from you without forcing, but from the opening of your left hip. With an exhalation, release your leg and place your right foot on the floor.
- Repeat the pose with the opposite leg.
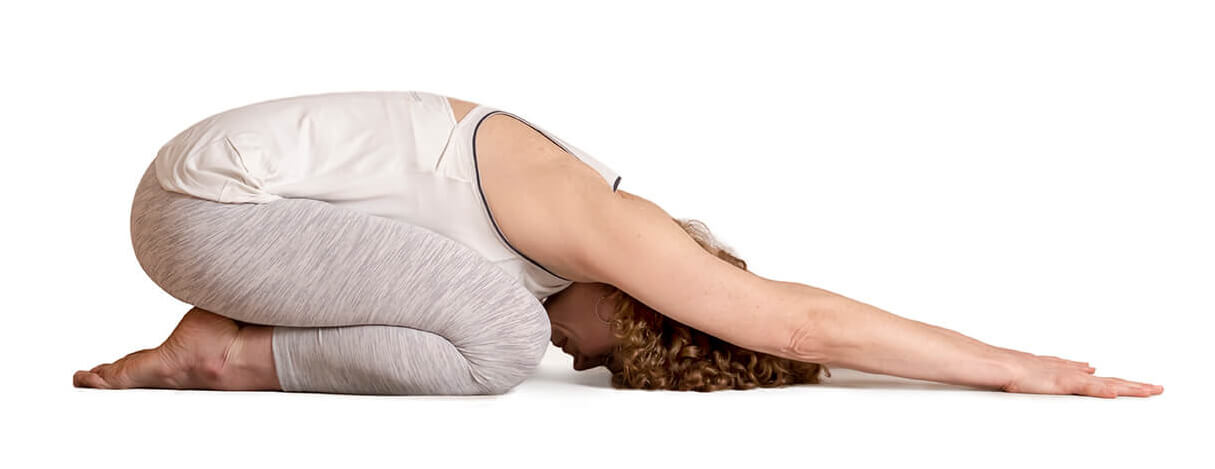
- Begin sitting on your heels with your big toes together and knees apart. For stiff hips or knees, place a folded blanket under your hips.
- Exhale and reach your arms out along the mat, moving your torso forward and down until your ribs nestle against your inner thighs and your forehead touches the floor, supporting it with a blanket or block if needed.
- Move your hips back and down.
- Relax your neck and back.
- To release, inhale and walk your hands in and raise your torso back up to sitting.
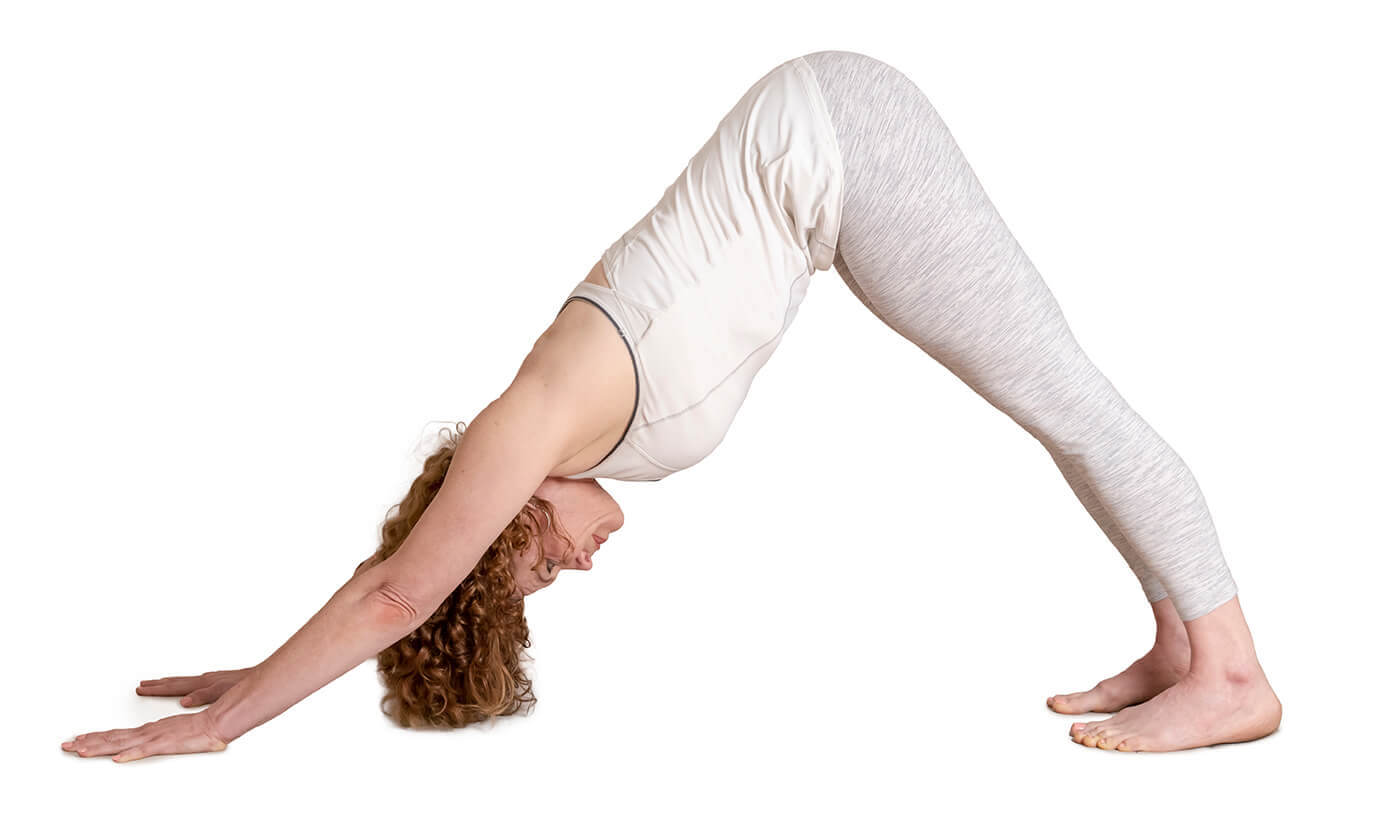
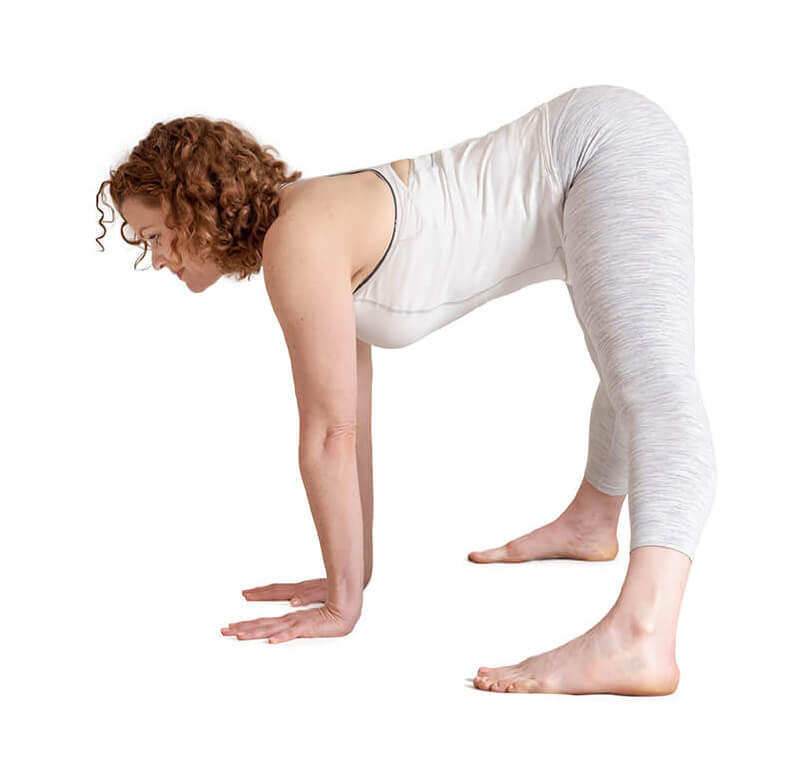
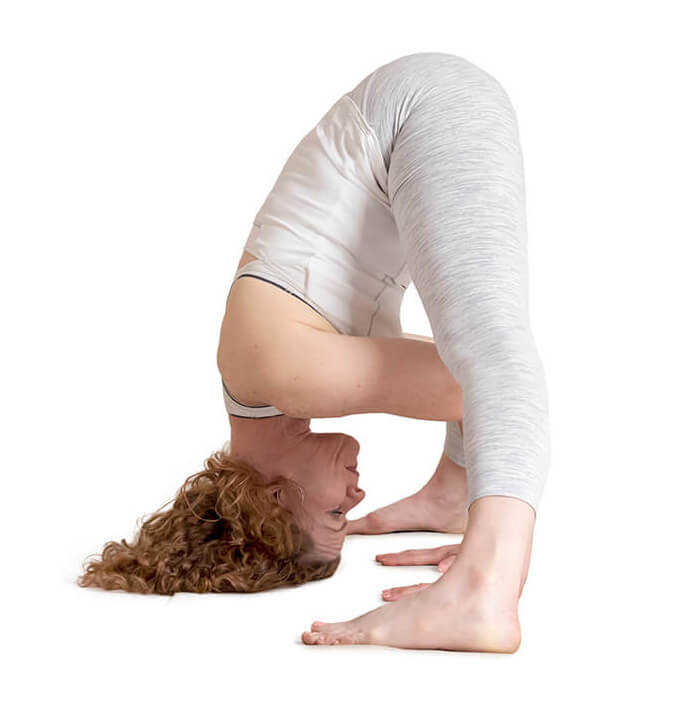
- Begin on the floor on your hands and knees. Set your knees directly below your hips and your hands slightly forward of your shoulders. Spread your palms, have your index fingers parallel or slightly turned out, and turn your toes under.
- Exhale and lift your knees away from the floor. At first keep the knees slightly bent and the heels lifted away from the floor. Lift your sitting bones up toward the ceiling.
- Press the tops of your thighs back. Begin to stretch your heels down toward the floor and straighten your knees without rounding in your spine. If you’re stiff in the legs, keep your knees bent and your heels off the floor as you continue to lift your hips up and extend your spine toward your legs.
- Press the bases of the index fingers down into the floor and firm the muscles of your arms. Firm your shoulder blades onto your back and stretch your chest away from your hands and toward your legs. Keep your ears in line with your arms.
- To release, bend your knees back down to the floor.
Read: Achieving Your Best Downward-Facing Dog
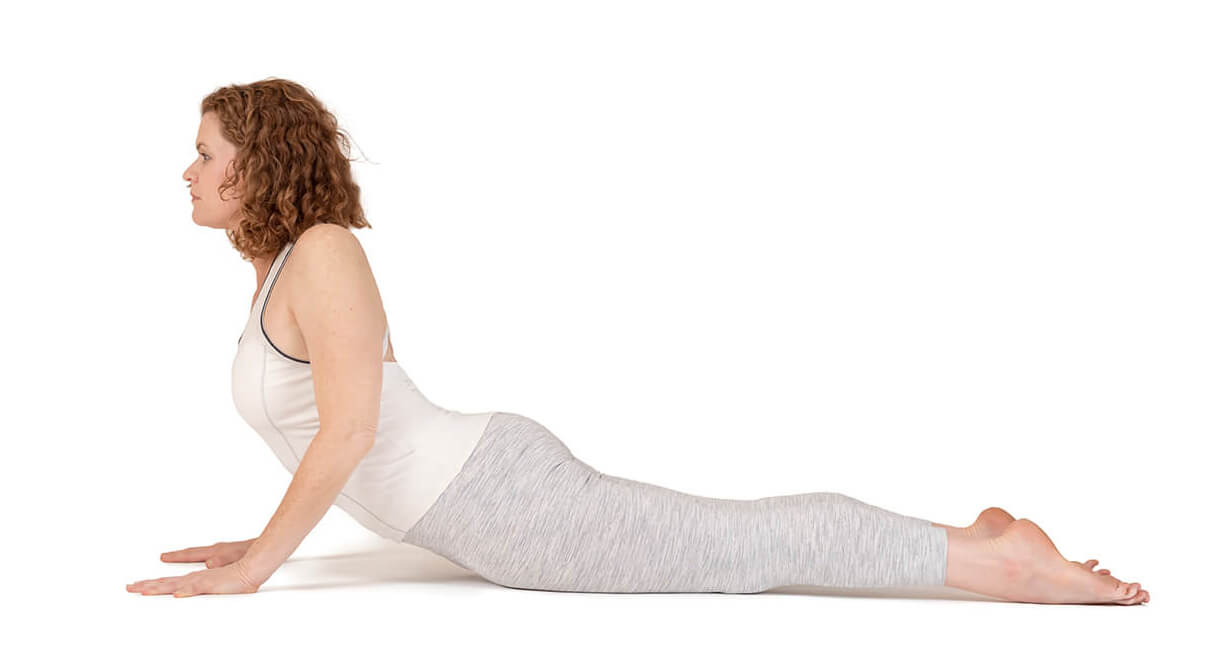
- Lie on your belly and place your hands a few inches below your shoulders toward your waistline.
- Extend back through your legs, press the tops of your feet down into the floor and firm your thighs.
- Draw your tailbone toward your feet. Firm the buttocks without gripping or hardening.
- Extend your ribcage forward and slowing raise your torso up without pressing into your hands.
- Roll the tops of your arms back, firm the shoulder blades on the back, and move your upper back forward toward the sternum. Lift your chest.
- Keep lengthening your tailbone down as you curl up higher.
- As you straighten your arms be sure to keep the tops of your arms rolling back as you lift your chest forward and up.
- To release, exhale and lie back down on your belly.
- Stand with your feet hip-width apart and toes pointing straight ahead, hands on hips.
- Inhale and lift your chest. Exhale and bend forward from the hip joints, not from the waist.
- As you descend, draw the front of your torso away from your thighs and lengthen the front of your body. Bend your knees as much as you need to and place all 10 fingertips on the floor or place your hands on blocks.
- Let your head hang from the root of the neck, between the shoulder blades.
- Keep your leg muscles engaged and straighten your legs as much as you can while keeping your fingertips on the floor.
- Continue to lengthen the front of your torso as much as the back as you move more fully into the position.
- To release, place your hands on your hips. Bend your knees as needed to support your back. Lengthen your spine forward and lift your chest to come back up to standing.
Mountain Pose (Tadasana) with Clasped Hands Behind the Back

- Stand with your feet hip distance apart. The weight should be even on each foot, from front to back and side to side.
- Firm your thighs and lengthen your torso up.
- Lift your chest and roll the tops of your arms back.
- interlace your fingers behind your back.
- Engage the shoulder blades onto the back of your ribcage. Lift and open your chest. Broaden your collarbones.
- Lift your rib cage evenly away from your pelvis; allow the back of your neck to lengthen upwards.
- Feel that your neck is free and your head is effortlessly balanced on the top of your spine.
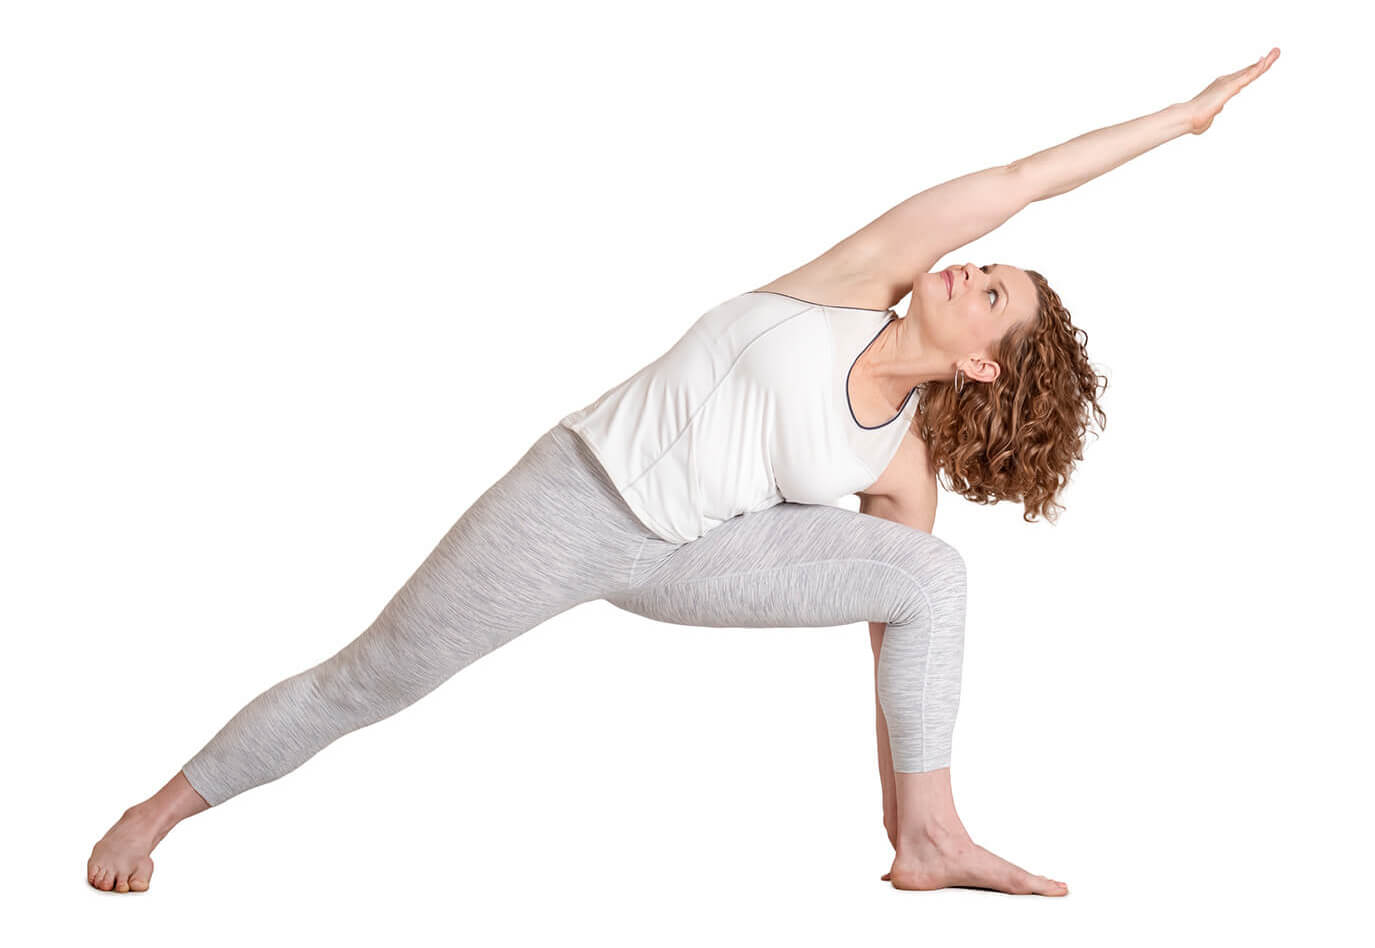
- Begin standing. Step your feet 3.5 to 4 feet apart. Lift your arms out to your sides.
- Turn your left foot in slightly to the right and your right foot out to the right 90 degrees. Align your right heel with the center of the instep of your left foot.
- Firm your thighs and turn your right thigh outward, so that the center of the right kneecap is in line with the center of the right ankle.
- Exhale and extend your torso to the right directly over the plane of the right leg, bending from the hip joint, not the waist. Anchor this movement by strengthening the left leg and pressing the outer heel firmly to the floor.
- Rotate the torso to the left, keeping the two sides equally long. Let the left hip come slightly forward and lengthen the tailbone toward the back heel.Rest your right hand on your shin, ankle, or on a block or the floor outside your right foot, whatever is possible without distorting the sides of the torso.
- Stretch your left arm toward the ceiling, in line with the tops of your shoulders. Keep your head in a neutral position or turn it to the left, eyes Inhale to come up, strongly pressing the back heel into the floor and reaching the top arm toward the ceiling.
- Reverse the feet and repeat to the left.
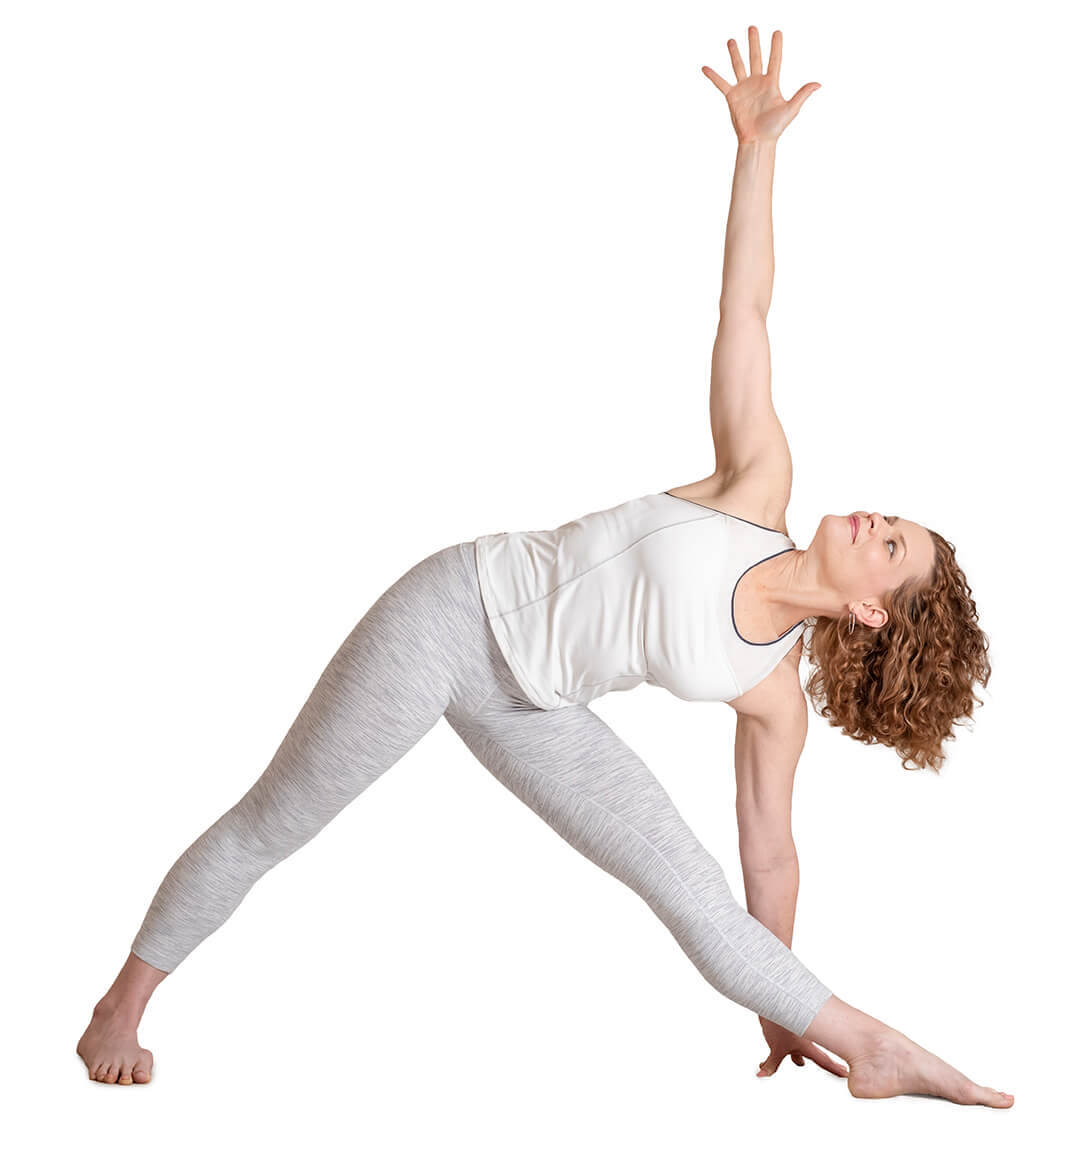
- Begin standing. Step your feet 3.5 to 4 feet apart. Place your hands on your hips.
- Turn your left foot in slightly to the right and your right foot out to the right 90 degrees. Align your right heel with the center of the instep of your left foot.
- Firm your thighs and turn your right thigh outward, so that the center of the right kneecap is in line with the center of the right ankle.
- Engage your quadriceps muscles by lifting your kneecaps toward your thighs. Bend your right knee to bring your right shin and thigh to a 90-degree angle with your right kneecap in line with your right ankle.
- Inhale and reach your arms out to your sides. Exhale and extend your torso over your right leg, keeping your spine long.
- Place your right hand on a block or the floor the outside of your right ankle. You can also bend your elbow and rest your forearm on your thigh. Reach your left arm over your left ear, with your palm facing down.
- Extend from your outer left heel out through your left fingertips.Keep your head neutral, or turn it to gaze at your left thumb. Inhale to come up, strongly pressing the back heel into the floor and reaching the top arm toward the ceiling.
- Reverse the feet and repeat to the left.
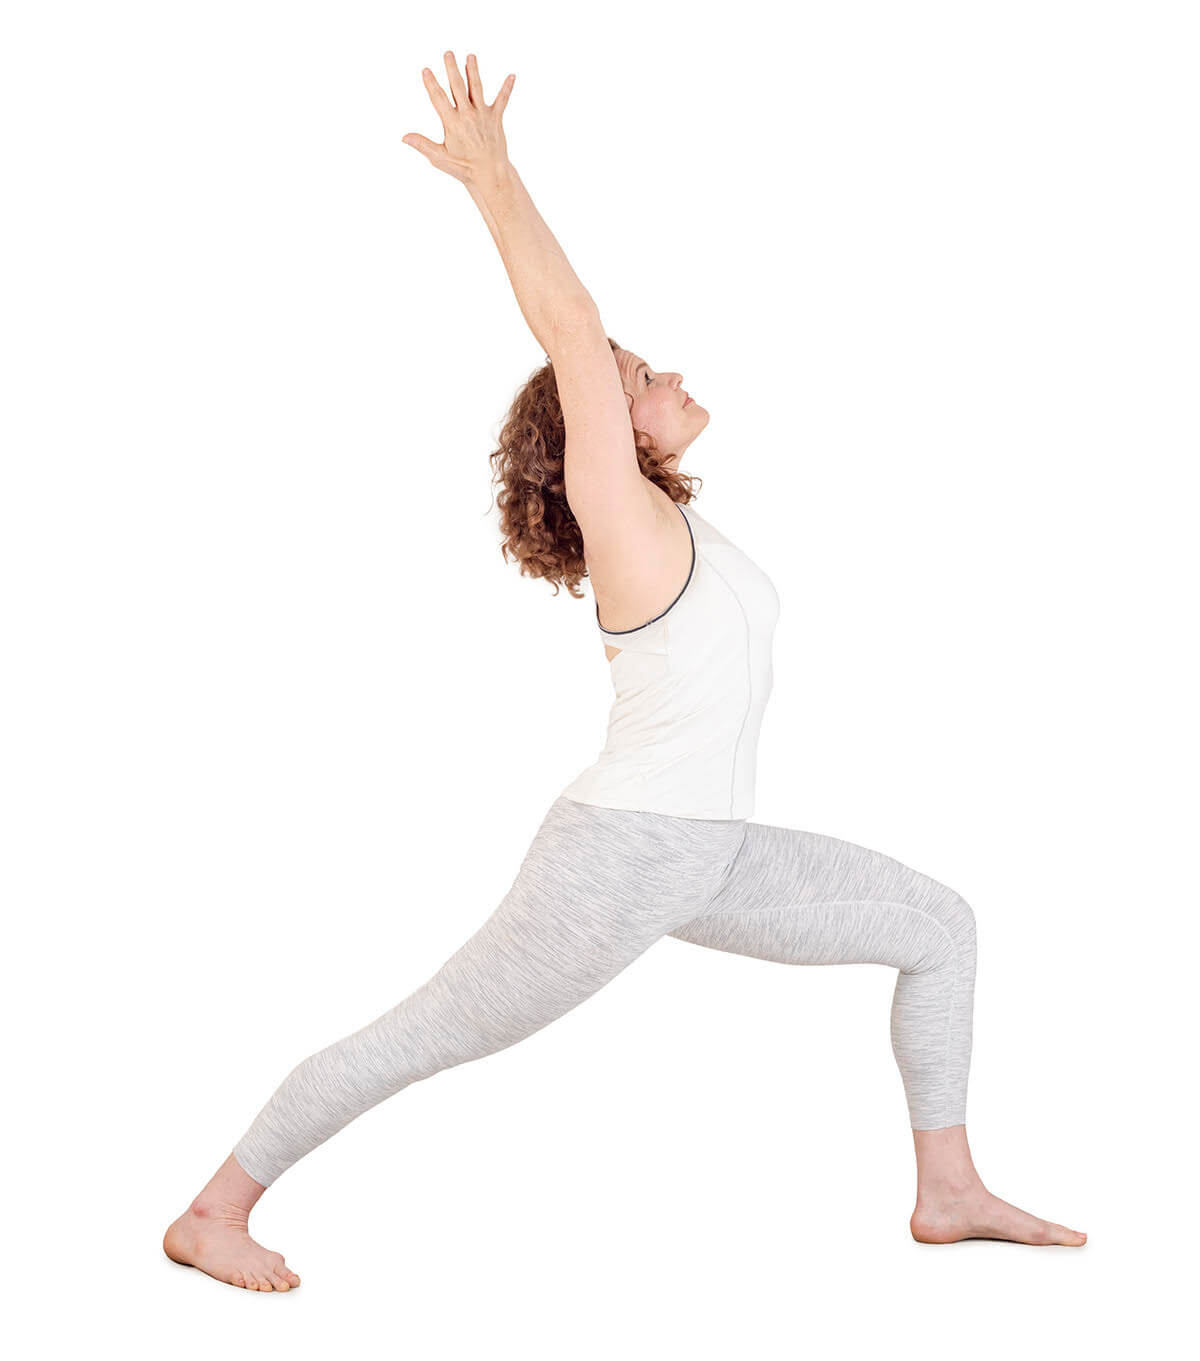
- Begin standing. Step your feet 3 1/2 to 4 feet apart. Raise your arms overhead.
- Turn your left foot in 45 to 60 degrees to the right and your right foot out 90 degrees to the right. Align the right heel with the left heel, or separate your feet slightly wider and more in line with your hips.
- Exhale and rotate your torso to the right, squaring the front of your pelvis as much as possible with the front edge of your mat. If your back heel lifts up, you may also work with the back heel against a wall for more stability.
- As the left hip point turns forward, press the left thigh back and extend down through the heel. Lengthen your tailbone toward the floor, and lift your chest.
- Exhale and bend your right knee over the right ankle so the shin is perpendicular to the floor. Reach up strongly through your arms, lifting the ribcage away from the pelvis. As you extend down through the back foot, keep your back leg strong and lifting.
- From the low belly lift the front of your body from the low belly up through the sternum. Open your chest and arch your spine back. Keep your arms parallel to each other, palms facing each other, or join your palms together.
- Keep your head in a neutral position, gazing forward, or tilt it back and look up at your thumbs. To come up, inhale, and straighten your right knee.
- Turn the feet forward and release the arms with an exhalationTurn the feet to the left and repeat
Stage One
Stage Two
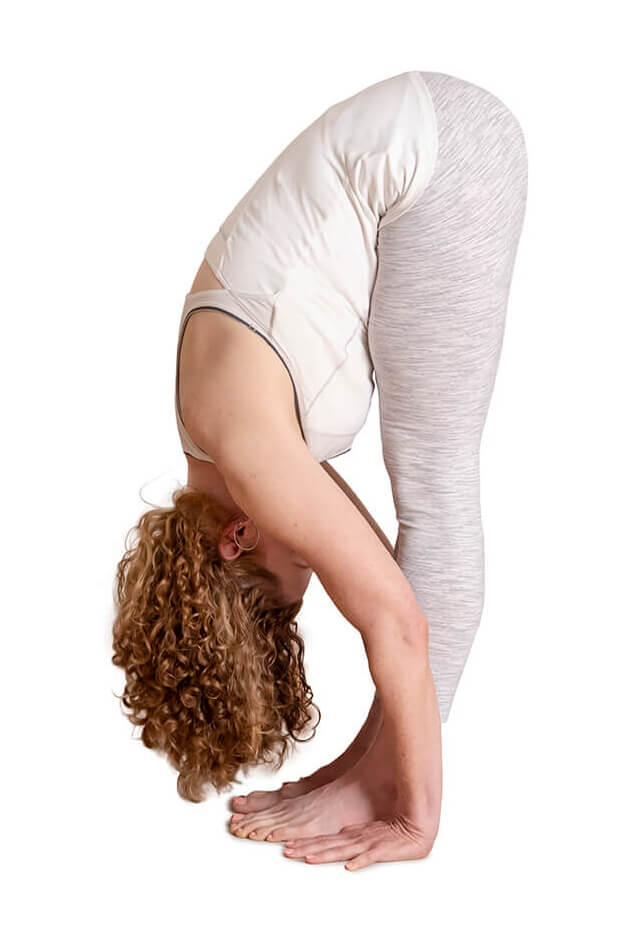
- Stand with your legs wide apart and feet parallel, hands on hips. Inhale, lift your chest. Exhale, fold forward from the hips. Place your fingertips on the floor beneath your shoulders.
- Come into Stage One with your spine parallel to the floor. Lengthen your spine forward, extending the front of your body from the pelvis to the sternum. Bend your knees as needed to extend your spine forward from your hips or place your hands on two blocks.
- On an exhalation, fold forward into Stage Two, releasing the crown of your head down toward the floor.
- Keep your legs strong and as straight as possible. Allow your torso, neck and head to release down toward the floor.
- To release, walk your feet a bit closer together, bring your hands to your hips and lengthen your spine forward to come up.
During These Times of Stress and Uncertainty Your Doshas May Be Unbalanced.
To help you bring attention to your doshas and to identify what your predominant dosha is, we created the following quiz.
Try not to stress over every question, but simply answer based off your intuition. After all, you know yourself better than anyone else.